Shoulder Anatomy and Muscle Bellies
The position of the belly of a muscle can be important. As yogiis, and other people who want to understand their bodies, if we know where the belly of a muscle is we can use that knowledge to guide where we place our awareness.
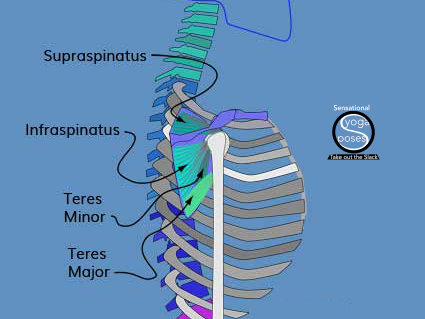
With the rotator cuff, the belly of all the muscles are on the shoulder blade. And so to feel these muscles activating, that's where we can put our awareness.
Rotator Cuff Problems
Rotator cuff problems are common and I'd suggest that the key (or one possible key) is starting with the ribcage. If you stabilize the ribcage, then you have a firm foundation for stabilizing the scapulae relative to the ribcage and then the rotator cuff muscles have a stable foundation from which to work on the arm bones.
Also important is flexibility. As mentioned, the scapula is meant to move freely on the ribcage. The more freedom of movement the scapulae have the easier it is to position them optimally with respect to the ribcage. The ribcage and scapulae can then both be stabilized in a position which allows the rotator cuff muscles to function as they should.
Some teachers suggest using the shoulders to help open the ribcage. While this is a valid approach it isn't the only approach. One problem is that unless given other options students only learn to stabilize the ribcage by using the shoulders instead of also learning to stabilize the ribcage using muscles integral to the the ribcage and thoracic spine. Enter the intercostals.
The Intercostal Muscles
The intercostals can be used to change the shape of the ribcage whether twisting it, side bending it or bending it forwards or backwards. And they can be used against each other to hold the shape of the ribcage. Where the obliques can be used to change or control the relationship between ribcage and pelvis, the intercostals which has the same angles of action, can be used to change or control the relationship between pairs of ribs.
For optimal performance I'd suggest learning to control the ribcage independently. Develop its mobility and your ability to stabilize it. Then you have a platform for developing scapular mobility and stability without mixing up shoulder movements and ribcage movements.
Rotator Cuff Exercises
With the ability to mobilize the scapula and fix it in place you then have a stabilized platform that can be fixed in a variety of positions from which the rotator cuff muscles can work on the upper arm.
And because of this rotator cuff exercises should help you develop ribcage awareness, mobility and stability as well as scapular awareness, mobility and stability.
Mobility and stability both can be summed up with the word control.
Shoulder Exercises
So far I've talked about the deeper muscles that work on the shoulder girdle. Larger muscles that work on the shoulder joint include:
- deltoid
- pectoralis major
- lattisimus dorsai
- teres major
- biceps brachialis
- coracobrachialis
- triceps long head
Shoulder stretches can be used to stretch them and may also affect the neck and ribcage.
Yoga Poses where the arms support all of part of the weight of the body can be used as Shoulder Exercises to strengthen these muscles in a variety of positions.
If you have shoulder problems one suggested methodology would be to work on isolation exercises to gain full mobility, awareness and control of all the parts.
Then work at integrating, or re-integrating the parts using more "whole body" movements.
Isolation Exercises
Isolation exercises for the shoulders can include isolated movements of the shoulder blades with the arms relaxed. That can mean spreading the shoulder blades (and then relaxing) and then retracting the shoulder blades and then relaxing.
And it can also include lifting the shoulder blades and arms (while keeping the shoulder blades spread) and then relaxing.
In all cases, you can focus on doing the movements smooth and slow so that you can then learn to feel your shoulder blades, and possible the muscles that help control the scapulae as well as the rotator cuff muscles.
This can then lead into partial body movements and then whole body movements with a focus on feeling, and controlling all relevant body parts. This can be done in step by step fashion so that it is easy to focus on feeling and controlling the relevant parts.
With enough practice movements can become programmed in, but still done with awareness. Instead of having to think about doing particular movements you can learn to feel the movements, whether is is movement and position of the shoulder blade relative to the ribcage, or tension in the shoulders and arms. Because you can then feel these movements you dont' have to think in order to vary movement or position, you can just look for the position or action that feels good, that makes your body feel stronger, and more integrated as a whole.
Shoulder Anatomy and Anatomy Trains
With respect to shoulder anatomy another way to create stability, control and sensitivity is based on understanding of myofascial meridians, and beyond that of the fascial network as a whole.
Connective Shoulder Anatomy
The fascial network includes muscle elements as well as tendons and ligaments. In this understanding of the body, muscle tissue is housed in pockets within the fascial network. When muscle tissue contracts it not only pulls on tendons, it also pulls directly on ligaments and it adds tension to the myofascial meridian(s) it is contained within.
Anatomy trains are longitudinal "trains" of muscle, basically pockets of muscle located within the same "train" of connective tissue. These meridians run up and down the body and also along the arms. They contain and connect muscles and because of this if once muscle within a train is activated, it affects the train as a whole adding tension to the connective tissue that houses other muscles within the same train.
By adding tension to an anatomy train you give the muscles (the other muscles) within that train a foundation from which to work. (The amount of tension imparted to an anatomy train depends on the relative size of the muscles or muscles that are contracted and also on pre-existing tension within that train. Severe bends in joints can make it easier to add tension to a particular anatomy train, even with smaller muscles. Note that it is easier to sense this tension if you are relaxed. And so their is a balance between adding just enough tension to give control while not adding so much that you lose sensitivity. This can be part of the learning experience. The result can be fluid movements where all parts of the body move as if driven by one central movement instead of lots of separate "dis-integrated" movements. )
Taking Up the Slack
If you've ever worked with gear wheels or machinery with complex linkages, there can be some play in the system, until you take up the slack. Once the slack is taken up force can be transmitted from one part of the machine to the other where the slack has been removed.
A tug of war (war of tugging?) team can do the same thing. pick up the rope and back away from the opposing team and from each other until the slack is remove from all parts of the rope (both between the two teams and also between adjacent team members.) Any changes in pull can then be transmitted through the whole rope. And if tension is maintained on all parts (i.e. the players act individually to keep tension on their part of the rope) then tension can continue to transmitted or communicated through the rope.
The simple idea here is that adding tension at one part (or taking it away) can be used to affect another. In terms of shoulder anatomy this can mean that an action like spreading the shoulder blades or retracting them can have an affect on the rotator cuff and depending on the action and position of the arm, may even affect the forearm, wrist and fingers. Adding tension to the ribcage can add to this effect.
Tension gives us sensitivity, responsiveness and control
Tension is relatively easy to create in most parts of our body, and no less in the shoulders and the bonus of creating tension is that we can use this tension to feel our body. Actually, when all the parts are properly tense or tuned, we can detect that tension and changes in it. And we can learn to adjust so that the tension isn't too great or too weak. And like taking out the slack in tug of war rope, this tension gives us control.
Stabilizing the ribcage can be as simple as lengthening the neck, lifting the ribs and creating space between the ribs. All of these actions add tension to the connective tissue that spans the neck, the waist and the ribcage. In an upright position, simply lifting up against the pull of gravity may be enough to add tension and stability to the ribcage.
However if lifting weight, then extra tension can be applied by "squeezing" the ribcage while keeping it expanded and by using the abs and diaphragm.
Making the body feel "long"
A simple way to create tension in the ribcage and the torso as a whole (and remember the shoulders sit on the ribcage so this is still relevant to shoulder anatomy) is to make the body feel long. What we interpret as a feeling of length is actually straightening the body and then adding tension while the body is still straight. As an example you can make your finger feel long by adding tension. You can make it feel longer by adding more tension. Does it get longer? No it doesn't, but the feeling of length increases and that increase is due to tension which means that the finger has just become more stable.
We can apply the same feeling to our torso. Make it feel long, and then longer yet to add tension. Creating a feeling of length straightens parts where necessary aligning them where possible but also pulls in an opposing direction to create the feeling of length.
Adding tension to stabilize the shoulder blades relative to the ribcage
With the shoulder blades tension can be added between shoulder blades and ribcage by either spreading, retracting, lifting or depressing the shoulders. In any position where the arms are supporting the body you can focus on creating space between the ribcage and the hands to add tension. If you focus on moving the shoulder blades to create this space then you add tension which stabilizes the scapulae relative to the ribcage.
If the arms aren't supporting weight, if they are free, they you can add tension to stabilize the scapulae by making your arms (all the way to the scapulae) feel long.
Published: 2012 05 10


