Warrior 1 and Warrior 2
On page cat links

The following description assumes you are doing warrior 1 and warrior 2 as part of the ashtanga sequence.
On page cat links

The following description assumes you are doing warrior 1 and warrior 2 as part of the ashtanga sequence.
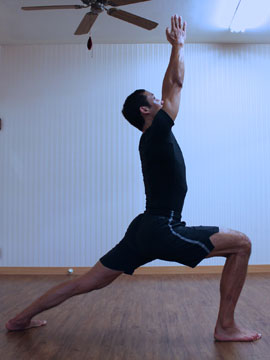
When doing Warrior 1 do not be afraid to adjust the position of your feet. The better you get at positioning your feet optimally while you are in the pose the easier it will be for you to simply step straight into the optimal pose from down dog.
In the asthanga context, the first version of warrior comes after uktasana. From utkatasana, you do a sun salutation to down dog and then step forward into right side warrior 1.
While in the right side pose you can work at these adjustments.
If your heels are on the same line you may find a stretch along the front of your left thigh, especially if you keep pushing your pelvis to the left.
If you have trouble balancing then widen your stance from side to side. Then work towards a narrower stance to help you improve your balance (and stability.)
Once you have set up your legs (or to help you set them up) imagine you are pushing a bus or a train with your hands using this stance as your base. Your back leg provides the push or braces you against being pushed back.
Carrying on with the same idea, try to align the center of your pelvis with the bones of your back leg. This is more of a feeling than an actual alignment, it feels like if your were being pushed and the push were transmitted to your pelvis your back leg would stop your from being pushed back.
Now direct the push (you are doing the pushing) from your leg to your pelvis, up your spine and out the crown of your head and your arms. Turn your forward push into an upwards reach.
Use your shoulders to push your fingertips to the sky.
Transmit the force of your push by keeping your elbows straight.
Hold warrior 1 for five breaths!
That's a lot to do in five breaths so while learning to feel the pose you might actually do it for longer. Eventually you'll get to the point where instead of having to do these actions sequentially you can do them all at once.
Inhale, stand and turn to the left and exhale into the left side warrior 1.

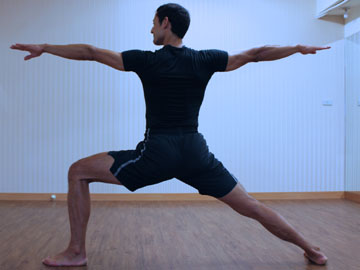
For warrior 2, turn your hips to the side and step your feet wider to maintain the 90 degree bends in your front knee and ankle.
Your left knee stays bent.
In warrior 2, imagine that you are bracing two walls with the edge of your right foot and your left knee. Turn your pelvis to wedge these two parts away from each other. Use your shoulders to push your fingers tips away from each other.
Push your ribcage away from your pelvis and your head away from your ribcage and pelvis.
Although you are looking at your front hand (the bent knee hand) feel your other hand. Feel the position where it is in line with your shoulder.
Turn and exhale into right side warrior 2.
Hold all of these poses, both warrior 1 and warrior 2 for five breaths per side.
To leave right side Warrior 2, put your hands on the floor. Shift your weight onto your hands (your shoulders will have to move forwards) then lower into chatarunga. Do up dog while inhaling and bend your spine backwards. Pull your chest and pelvis forwards. Pull your arms and shoulders back.
Move to down dog while exhaling and push your ribcage and pelvis back and up.
