Low Pigeon Pose
Pushing back to activate your hip and your shoulders
Normally in down dog I teach yoga students to push their ribcage and pelvis back using their arms. I usually have them do this while inhaling and then have them relax their shoulders (while maintaining the shape of the pose) while exhaling.
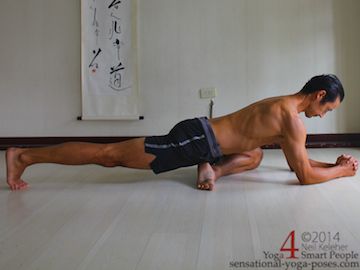
In the laying down version of pigeon pose, which I'll call low pigeon pose, you can do the same thing. Use your arms to help push your ribcage and pelvis rearwards.
I like to move into this pose slowly.
If you find this pose creates sharp pain in your front knee, then leave it out. Optionally, do this pose with he front leg hip on the floor.
Getting less uncomfortable in low pigeon pose
With your right foot forwards and your hips level from left to right, place your elbows on the floor. You could stay here until comfortable (or less uncomfortable.)
Push your knee forwards
One way to get more comfortable in low pigeon is to actively push your front knee (and even your whole shin) forwards against the floor. You may find that your hips move slightly back (and down) as a result. You may also find that the hip muscles of your front leg activate.
So that you can get used to feeling all of this, relax and then repeat the action while focusing on feeling your knee and shin, and from there your hip.
Push your arms forwards
While you are on your elbows (or failing that, your hands) you could push your forearms forwards, against the floor. As you do this you may find that this causes your ribcage and pelvis to move back. Try pushing your shin forwards first using your leg so that your hips move back. Then, keeping the front leg active, use your arms to give your ribcage a push back. Slowly relax and then repeat.
You can experiment with using just the arms or just the front leg. Or try using the arms first and then the leg (instead of the leg first).
On any given day, use whichever feels the best.
Sink your chest
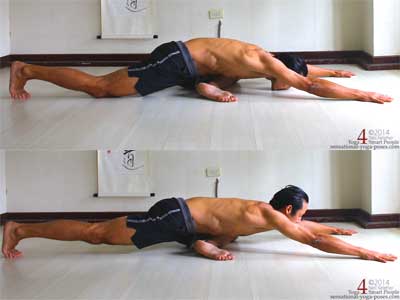
As your hips get more comfortable, particularly your front leg hip, you can try lower your chest to the floor by widening your elbows. From there, you can then reach your arms forwards.
At first, keep a very slight bend in the elbows. Then straighten your elbows to help push your ribcage backwards. For even more of a push back, try using your shoulders to push your ribcage back (as you might do in downward facing dog.)
Relax and repeat.
Remember to push your front knee forwards and down as you push back. The feeling may be like pushing your pelvis back away from your front knee.
As your pelvis sinks down, work at keeping it level from left to right.
Adding weight to the hip stretch in low pigeon
To add weight to the hip stretch lift the back knee a little bit. The back foot can be flat on the floor or the toes can be tucked under. In either case press the foot down into the floor to lift the back knee.
To add even more weight lift your chin off of the floor and pull your ears forwards, away from your shoulders so that your neck feels long. To make the back of your neck feel open and long, look down and tuck the chin slightly into your chest.
Gradually Deepening the Hip Stretch in Yoga Pigeon Pose
The further forwards you have your front foot (increasing the angle between shin and thigh) the deeper the hip stretch when doing yoga pigeon pose.
I'd suggest that the deepest stretch occurs when you have your front shin parallel to the front of your mat so that the front knee is open to almost 90 degrees. This can be challenging (and painful.) So I like to work towards this foot position gradually.
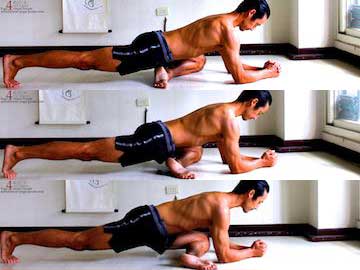
- Start with your foot back so that your knee is open about 45 degrees. Hold for about a minute.
- Then come up out of the pose and move your foot forwards a little bit. Go back into the pose.
- Then repeat one more time with your foot repositioned so that your front shin is parallel to the front of your mat.
For each variation try to keep the pelvis level from left to right. This can be extremely difficult when the shin is parallel to the front of your mat. So do the best that you can.
In the picture above I'm on my elbows so that you can see the changes in foot position. Start of on your elbows and then when comfortable, reach your arms forwards. If lifting the back knee, lift it slowly and carefully, so that you can stop if you feel any pain in your front knee.
Look After Your Knee
Also, be careful with your front knee. In general I move into this position and out of it slowly and smoothly so that I can stop if I feel knee pain. Generally I can then adjust the position my my shin and the way that I am doing the pose so that my knee doesn't hurt. That can mean pushing my pelvis back away from my knee and also making sure that my front foot isn't flexed. (See this video on pigeon pose hip stretch for more.)
What's Next After Pigeon Yoga Pose?
Yoga pigeon pose can be used as a preparation for other hip externally rotated yoga poses like lotus, and foot behind the head.
You can counterbalance pigeon type yoga poses (which tend to stretch the outer thigh) with inner thigh stretches like bound angle pose and half side splits yoga pose and an internally rotated hip position pose like Hurdlers Stretch
Published: 2017 12 14
