Are You Being Lazy In Upward Dog?
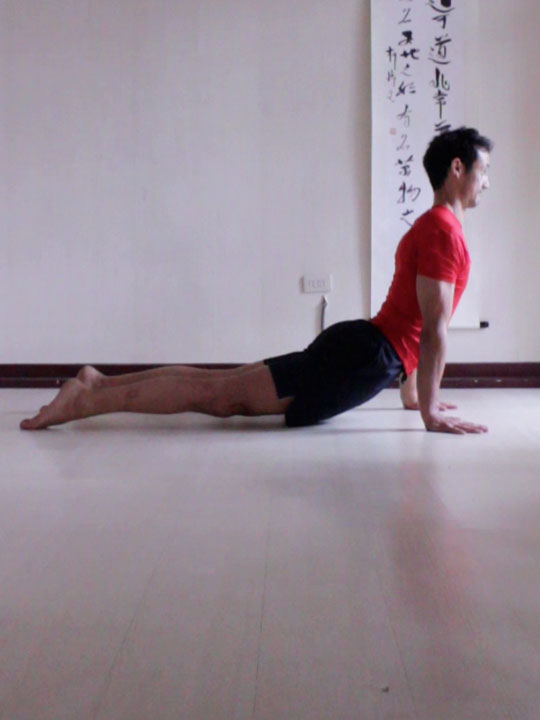
One of the difficulties with upward dog is that it is easy to hang from shoulders and feet and let the weight of your body bend your spine backwards.
The trouble with this method, particularly if you lack flexibility in your spine and awareness is that it may cause some parts of your spine to bend more than others.
Part of the answer is learning to use the spinal erectors to bend the spine backwards in this basic yoga pose. Another part of the answer is using the legs.
Upward Facing Dog General Body Positioning Points
In upward facing dog (also called urdhva muka svanasana) the arms are straight and vertical with the palms on the floor.
The legs reach back behind you with the knees straight and pointing downwards and with the tops of the feet on the floor. The ribcage and lower back both bend backwards and the pelvis is lifted, hanging from the bottom of your ribcage.
The more your bend your spine backwards and lift and open your ribcage in this pose the easier it is to look up (upward facing) or even back behind you.
I generally like to look forwards.
Building Blocks for Upward Facing Dog
Chin Lift and the Cervical Spinal Erectors
I often do spinal erector introduction exercises while standing or sitting but since upward facing dog starts from a prone (belly down) position it makes sense to teach spinal erector activation for this pose while laying down.
As a side note, when activated the spinal erectors create a "contracted" feeling at the back of the body on either side of the spine. If you learn to feel this feeling (and learn to create it at will) then you can activate the spinal erectors in any position at will (given that it is possible in the first place).
One main difference between how I teach spinal erector activation when standing versus laying on the belly is that while standing I start the activation from the bottom upwards, first lifting the tailbone (thus tilting the pelvis forwards so that the pubic bone moves downwards) then focusing on the backwards bend in the lumbar spine and then carrying that backbend up into the thoracic spine.
Laying down I tend to work downwards from head to pelvis. These are just two activation patterns that make learning to activate the spinal erectors easier. In different situations you may choose to practice just activating the thoracic spinal erectors, or just the lumbar spinal erectors or just the cervical spinal erectors or some combination there of.
- While laying on your belly: lift your chin off of the floor. Keep your shoulders relaxed and your ribcage on the floor.
- Focus on feeling the muscle action along the back of your neck.
- Experiment with bending your neck backwards (move slowly and smoothly and try to make the movement as comfortable as possible) or just focus on making both sides of your neck long by drawing your ears away from your shoulders. You could also focus on opening the back of the neck so that your chin stays lifted but moves towards you chest. In this instance, imagine creating space between the spinous process of the cervical spine.
Hold for five or so breaths then rest and repeat three times.
Thoracic Spinal Erectors (and the Upper and Lower Ribcage)
The ribcage can be divided into an upper and lower half.
- The upper half includes the part that attaches directly to the sternum. It has 7 vertebrae and 7 pairs of ribs.
- The lower half creates to the arch of the ribcage below the sternum. It has five vertebrae and 5 pairs of ribs, the bottom two of which are short and floating. They do not connect to the costal arch.
The upper half is more difficult to bend because of the sternum while the lower half is easier and for this reason it can be helpful to have practiced spinal erector activation while standing and working from the bottom up. (The lumbar spine is even easier to bend backwards than the lower ribcage and so starting of with lumbar spinal backbends it is then relatively easy to carry the "contracted" feeling of the lumbar spinal erectors upwards and thus consciously activate the spinal erectors of the lower thoracis spine.)
You can work at bending your upper thoracic spine backwards after lifting your chin. You could imagine peeling your ribcage off of the floor one set of ribs (and one vertebrae) at a time. So instead of just lifting the ribcage, bend it backwards one vertebrae at a time. Focus on lifting the upper ribcage (and keep the neck long) and then lower down and rest. Repeat two or three times just focusing on the upper ribcage. Then repeat but add the lower ribcage. In all cases see if you can feel your spinal erectors activating to bend your thoracic spine backwards.
Activating the Lumbar Spinal Erectors while Prone
Next try lifting your tailbone while keeping your chin and ribcage on the floor. Lift your tailbone and bend your lumbar spine backwards. Remember the feeling and then relax. Lift your chin, bend your thoracic spine backwards then bend your lumbar spine backwards by lifitng your tailbone first. Hold for a few breaths seeing if you can gradually deepen the back bend. If may help to move the backs of your ribs forwards, away from the pelvis.
This action uses the levator costalis muscles.
Practicing Scapular Awareness
The next exercise is to place your hands on the floor next to your ribcage. Point your elbows back and fingers forwards. Bend your spine backwards and lift your hands. Then touch them to the floor and then relax. Repeat a few times getting used to keeping the spinal erectors active.
Next keep the hands on the floor. Lenghten your neck and bend your thoracic spine backwards. Keeping your spinal erectors active use your arms to lift your ribcage higher but keep your pelvis on the floor. Optionally at this stage you can lift your tailbone and activate your lumbar spinal erectors.
(If you haven't already practiced the scapular awareness exercises while sitting or standing you could do them next.)
While laying down you can practice lifting your shoulders and retracting your shoulder blades. Then try pressing them down and protracting your shoulder blades. Next move them towards your ears (elevation) and then away from your ears (depression.) Rather than just moving your shoulders focus on feeling your shoulder blades with respect to your ribcage. With your ribcage on the shoulders move relative to the ribcage.
In upward facing dog when your move your shoulders, because the hands are on the floor, the ribcage is going to move relative to your shoulder blades.
Adding the Arms with Elbows Bent
Bend your thoracic spine and lumbar spine backwards and lengthen your neck. Keep your spinal erectors active and use your arms to lift your ribcage. Keep your pelvis on the floor, elbows will probably have to stay bent. Point your elbows backwards. Relax your shoulders so that your ribcage sinks down (this may ease pressure on your back and pelvis). Then use your shoulders to elevate your ribcage. Try to keep your elbows bend. Repeat a few times then rest. Next with the chest down move the ribcage backwards (protract the shoulder blades) and forwards (retract the shoulder blades.) Repeat a few times then rest. Then do it again but this time protract and retract the shoulder blades with the ribcage lifted relative to the shoulders.
If you protract your shoulders and lift your ribcage you may find that you easier to create a downard pulling feeling on your upper arms bones. For now I would suggest experimenting with all of these shoulder positions and using the one that feels the best.
Straightening the Elbows and Activating the Back of the Legs
Next, you can do the same but with the elbows straight. Your pelvis will lift off of the floor and you can straighten your knees.
To straighten your knees you may find it helpful to press your feet into the floor. Think of pressing your feet down in order to lift the knees.
Because this is a back bend, instead of lifting the hips think of pulling the pelvis forwards and down. To assist in this action activate the buttocks (gluteus maximus) and the backs of the thighs (hamstrings.) But keep the knees pointing straight down (as opposed to rotated outwards or inwards.)
Note that to pull your hips forwards it may help to pull backwards against the floor with your hands. This same action may help to pull your chest forwards, through your shoulders. Again experiment with protracting or retracting the shoulder blades while pulling your hands backwards to see which position feels best (it may be somewhere inbetween or it may change from time to time.)
Hand Position and Neck Options
In addition you can also adjust the rotation of your hands so that your palms are turned slightly outwards or inwards. You could walk your feet backwards or forwards so that your shoulders stay over your wrists. However, if you upward dog is too difficult and likewise you find it difficult to hold the pose with elbows bent then move the hands forwards of the shoulders till you can have your pelvis on the floor with your elbows straight. Do still keep your spinal erectors active but then see if you can use the arms in this position to help slowly increase the backwards bend of your spine.
Rather than keeping your finges relaxed activate your fingers, press them into the floor.
If you are doing upward facing dog with your shoulders over your wrists you may find that you can adjust this position slightly so that the fronts and heels of your palms press down with equal pressure. If you wish to maintain the position of your shoulders relative to your wrists then to equalize pressure in the fronts of your palms and the heels then deliberately press down with the fronts of your hands and/or fingers.
Other options for this pose include doing it with toes pointing backwards or tucked under. Doing it with toes tucked under you can stretch the bottom of the toes. You can also give your pelvis more room to move downwards relative to your feet (causing an increase in the amount of backward bending.)
With respect to the neck in this yoga pose, I generally prefer to do it with head level. If you are going to experiment with doing it with the neck bent backwards, move slowly into the cervical back bend. Experiment with your shoulders as you do so, either protracting, retracting, elevating or depressing the shoulders blades (or some combination of the vertical and horizontal movements). With shoulder blades lifted and retracted (so that ribcage moves down relative to the shoulders) you may find that the shoulder blades and upper trapezius form a slightly shelf against which the back of your head can rest.
Counter Poses for Upward Facing Dog
If you are doing upward facing dog as part of a sun salutation then the counter pose can be downward facing dog, or the exhaling forward bend. In either case you could bend your spine forwards to stretch the back of the spine.
If you are doing this pose as part of a do it yourself routine then you could do a bent back hero or kneeling pose to bend the spine forwards or do a standing spinal front bend or a standing forward bend with spine bent forwards. Crow pose could be another optional counter pose.
If you are using downward dog as a counter pose I'd suggest focusing on doing it with the spine bent forwards. So rather than lifting the sitting bones to tilt the pelvis forwards, move your pelvis so that your sitting bones move downards, bending your lumbar spine and your thoracic spine forwards.
Published: 2017 07 06
Updated: 2021 02 09


